Tuesday, September 18, 2018

Dot Producting That Makes Mathematical Sense

Note to self for next year when you do dot product: You know how you've tried so many times to get the dot product to make sense to your students, and failed?

Well, Future Audrey, this went well.

While waiting for kids to arrive:

I wrote <3, -4> on the board and asked all students, as they entered class, to write another vector that was orthogonal to it, but it had to be different to everyone else's. After the easy ones were done, ie <4, 3> and <-4, -3>, others had to go with ones that were collinear to one of those. This was to remind all that when 2 vectors are orthogonal, 3 things have to have happened between their components: a switch, exactly one sign change, and a multiplication by some scale factor (which can of course be 1). Also a good opener, bc kids who are early or on time got the chance to put the easy ones up, and those who arrived late were quickly able to catch on and jump in right away.

Now that everyone was there and warmed up:

All voted as to the truth of these statements:

For 3/4 = 6/8 I asked: How do you know it's true?
-I punched 3/4 then 6/8 into my calculator
-Iimmediately recognized that num and denom had both been doubled

But only one student talked about cross product. This was an eye-opener to the rest. They are used to "cross-multiplying" to solve proportions but they didn't know where it came from...we tried that out on a few known true proportions.

Next eg on the slide: For 3/4 = -24/32 I asked what's the fastest way to tell this is false?
-Opposite sign

Ok then I inserted negatives in various positions and did T or F each time? We agreed that only if there are an even number of negatives in total is it true.

Last eg we knew must be true because both are = 3/4, but we used cross product to check. Agreed that it was at least as fast as dividing twice

Back to orthogonality:

Went through these:
And I first asked in each case, are the signs a deal-breaker? Agreed that here we want to see a total nbr of negs that is odd, since that means exactly ONE sign change has happened.. First two egs easy to decide.

3rd eg: I asked: Write how you're checking for proportionality. Established that to accommodate the switch, we compare 4.2 to 3, and 2.8 to 2. Got 4.2/3 = 1.4, and 2.8/2 also = 1.4 so they're good. 4th eg immediately eliminated by signs. 5th eg we worked out on board fully, showing who was divided by whom, and that each quotient came to same nbr.

Reframing: And this is the part I've messed up all these years (Sorry students of my past.):

After last eg I reframed that process this way:
I asked do we really need to know how much 18.6/4.2 is, or is it enough to know what ELSE comes to the same thing? Then we used that "new" cross multiplication way of checking for proportionality to arrive at the last line.

Then asked them to compare the last line with the first, to detect where the 4.2 and the 34.1 came from. "They're the x components of the two vectors." And the 7.7 and the 18.6? "The y-components."
Emphasized that if the product of the x-components is equal to the product of the y components, we know that between the two vectors, a switch AND a scale factor multiplication have happened.

Moved to actual dot product definition now:
Took my time to highlight notation here - the dot, the subscripts, also that this involves multiplying the x components, and the y components, like we just did.

Activate one last thing they already know:

I went to a blank screen and wrote: If a + b = 0, then what do you know for sure about those two numbers?
Various answers:
-they're both 0
-they cancel each other out
-they're the same number but one is + and one is -

We agreed that they must be opposites (allows for both = 0)

Moved back to definition of dot product and wrote: 
and asked - what must be true about uxvx and uyvy if they too add up to zero?
-they must be opposites.

So now we know that there's been a sign change, a switch, and a scale factor multiplication.

Used dot product to detect orthogonality or lack of it on a few more egs.

We also moved on to what it means when dp comes to a positive, and a negative, but the why of that not so much - next year maybe you'll figure that out, Future Audrey.

Tuesday, June 12, 2018

Student-Created GeoGebras and Graspable Math

I. Cannot. Wait. Till. Next. Year. When my students will use Graspable Math to work out their formula for the sticky zero in their GeoGebra OMG:


Reflections on Learn's Self Paced Blended Learning Year One

My last post described the creation stages and final product of our first year in what we called the Self Paced Blended Learning project. This post is our collective reflections on the experience, so when I use "I" or "we", I'm speaking on behalf of the staff..

The Creation Stage:

Simply put, this stage was a huge amount of work, and required some working through holidays, just to meet the deadlines. But the benefits far outweighed that.

I had thought it would be a simple matter to simply take all of the digital content we'd all created over the years for our own courses (yes we create our own and we have SO MUCH STUFF) and rearrange it all in one online space, in a visually appealing and easy-to-understand way. Hilarious. Adorable even.

When you have to add in context - those crucial bits of text that make it possible for a student aged 15-ish to keep motivated, to understand what to do, when to do it, and where to put their work, and know that a real human being cares whether or not they are ok, you quickly discover all kinds of holes. You also discover just how much just-in-time on-the-spot teaching and spontaneous learning happens during the live class! We all ended up creating many new resources to make the self-paced experience as close as possible to the real-time one.

At this point it's clear that even if no one had taken the SPBL course, this process would've ended up benefiting everyone - in the short term and the long term:
  • Because of the SPBL deadlines, I was prepared and ready for my real-time classes an entire month ahead of time, which I had NEVER been in my entire career. That was a double edged sword, mind you, because it freed my mind to come up with lots more spontaneous ideas during class, which in turn meant more SPBL stuff to include in the weekly meetings...not a vicious cycle, but a self-perpetuating one!
  • As I mentioned before, a lot of holes got filled even for my Real-Time students. They benefited from much more thorough and frequent checks-for-understanding, as well as new and better voicethreads that otherwise wouldn't have been made, at least not all in one year.
  • Writing those Introduction & Why Are We Learning This? blurbs at the beginning of each unit  gave me a deeper appreciation for the content. I've never been comfortable answering "When are we ever going to use this?" with "On the final exam", but neither have I ever given the question much deep thought. It made me appreciate how these things fit into the bigger picture. I should have been doing this all along. 
  • The big picture - I had never had the opportunity to look at the whole course in one spot before, and as it took shape over the year, many opportunities to connect different topics were suddenly revealed to me. Orthogonal vectors & trigonometric points. Hyperbolas and rational functions. The linear thread through EVERYTHING - every single kind of equation we learn how to solve gets turned into some kind of linear equation! Who knew?
  • Also big picture, but for next year: The yearly overview makes it easy to schedule certain routines, like "Always Sometimes, or Never?" or "Which One Doesn't Belong?" on a regular basis, instead of whenever I happened to have the presence of mind to think of it.
The Weekly Student Meetings:

Ideally, every student should have the opportunity to get 100% of their teacher's attention and focus on a regular basis. What our SPBL students missed out on in the synchronous experience, such as social learning and the feeling of belonging to a group, they were compensated for in personalized learning.

Everything that happened in a meeting could also have happened in a real time class, but it's very different in a one-on-one. Put a student in a class of 20-30 people, in which the teacher says "What do you think of this?" Then put that same student in a one-on-one meeting with the same teacher saying the same thing, and those words will have a profoundly different impact. Words sound entirely different, indeed the message they convey IS entirely different, when you know they are directed at you and only you.

The Overall Student Experience

You might think that the amount of time the SPBL students spent on their own made the format rather impersonal and bereft of human interaction, but the exact opposite was true. First of all, in our weekly meetings, we're going over one person's work, focusing on exactly what they and only they need, as opposed to the usual showing of all the solutions to everyone, regardless of what kind of results they got.

Moreover, the one-on-one meetings made it impossible to hide, impossible to not make your personality known. By contrast, in an online synchronous class, where there is no body language to colour everything you say, it's the relatively rare student whose personality is accurately and fully transmitted to the other people online. Obviously, the teacher is an expert at that, but most students would rather remain as invisible as possible, choosing to text their comments rather than use their microphone. Of course this is not even remotely possible in the weekly meetings. It was nice to not be the only one using their voice for a change.

The agenda for each meeting was set by the teacher, and even though there were plenty of opportunities for the students to add his or her own items, it felt rather teacher-driven. Since SP students are required to be more active participants in these one-on-one sessions, we're hoping that next year they will be the ones driving the meetings.

The meetings, along with the friendly tone of the blurbs and instructions scattered throughout Sakai, were hopefully enough to make the whole experience human for our inaugural students. It's hard to imagine anyone being able to complete a course that only involves automated interactions, in which no one is invested emotionally or even intellectually. Teenagers especially need to know someone cares about their success, even if they themselves get discouraged and lose motivation.

The Overall Teacher Experience

I was excited about this project when we first started talking about it, then when we were in the thick of it I got a bit discouraged, because it really seemed at one point like the content was too complex to be covered this way. I turned a corner about halfway through the year, when I began making actual slides for my meetings, and when the students started settling into the routine. It really helped when they did well in their midterms. That was when it stopped feeling like an experiment and started to feel like an exciting new direction for Learn. As is always the case with everything Learn does, it all comes down to the students.

If it works for them, we're in.

Thursday, May 31, 2018

LEARN's Self-Paced Blended Learning: Year One

Have you ever put your life's work all in one place and tried to make it coherent and meaningful and beautiful? Me neither, until this year! This post is part one of two posts about an exciting new project at LEARN, where I am lucky enough to work.

At LEARN, we offer fully synchronous online courses to Quebec's English high school students, and have been doing so for a long time...19 years to be exact. This year, we also offered some of the same courses in a different format, which we called "Self-Paced Blended Learning", or SPBL for short. We did this to accommodate the students who wanted to take our courses, but who couldn't fit them into a Monday-to-Friday schedule given their school’s cyclical schedules.

To achieve this, we had to find a way to make our courses available in a format that would allow for self-pacing, while at the same time address the fact that students at that age need guidance. To balance independence with support, we blended the asynchronous with the synchronous. We decided that in addition to the asynchronous delivery of digital resources, teachers would meet each student individually on a weekly basis. In addition, we'd create opportunities for students to interact with other students who were also following the course, both those in the SPBL format and those in the live (Real-Time) classes.

We're now coming to the end of Year 1, so it's time to record - and reflect on - what actually happened. Here goes!

The journey begins:

The first task for us was creating the online space for the course. This was started about 8 months before we launched the courses in September 2017, when we didn't even know who, if anyone, would be taking it. Each teacher filled in a template (provided by our project lead) for each unit in our course, which included everything the students would see - lessons, activities, quizzes - everything, as well as the context for each step. For example, a link to an assignment needed to be preceded by:
Please print this assignment, and complete it by Friday. Be sure to show all your work! You may hand it in via fax or your dropbox.
The writing of the context proved to be time-consuming, and also extremely important, because it was the human part. More about that later.

The contents of the template were then uploaded to our Learning Management System (which is Sakai), made to look cohesive and orderly, then vetted by fresh eyes. The plan was that all this would be done well before any student would see it - a good month at least, which we managed to meet, for the most part, despite simultaneously having a regular teaching load.

How it all ended up looking:

All of the materials were organized by unit, week, and lesson. Here's a snapshot of the landing page for one unit:


Upon clicking on a week, students would see an overview of the week's lessons, plus a link to the checklist:


Lessons:

A lesson in this context was actually a single web page, which displayed a self-contained series of activities centered on a single topic. It generally included some kind of recorded delivery of content, (usually a Voicethread, which is an interactive format of content delivery), some practice work from the text, the answer key, and a check for understanding. It may also have included other types of interactive elements, such as a Desmos activity or an Explorelearning gizmo. Here's an example of a lesson page (rearranged slightly to fit here):


Check for Understanding:

The check for understanding may have been a self-correcting multiple choice question as in this case, or a link to a googlequiz, GoFormative, Explorelearning gizmo, Seesaw reflection etc. Again, this served both the teacher and the student. Both had regular reassurance that progress was happening.

Each lesson page ended with a reminder to go update the checklist.

Checklists:

The checklist was a means for keeping student and teacher connected in between the weekly meetings. Not only did it help the teacher to track student pacing, but it was a way for a student to let the teacher know of any issues - specifically those related to the content, such as if they need help on one particular question or activity. They of course had other ways to contact us for more immediate issues, such as technical ones, but this was mainly for their reactions to the content.

Here's a partial screen capture of a checklist (created using google forms):


The checklist included everything that was contained in a whole week. We used the checkbox format, and included "Other" in case students wanted to tell us anything over and above the checkbox options.

Assessment:

Students wrote on good old-fashioned paper for some assignments and for all of their tests. Since all of our students attended a regular brick-and-mortar school, supervision was handled locally, and all paper & pencil work was transmitted to us via the school contact person. The SPBL students wrote the same assessments as our Real-Time students.

Weekly meetings with Students:

Each meeting included a close look at all of the student's own work, including and especially assessments. This was a golden opportunity to correct and redo any missed items right away, which is something that is essential for all students but which takes much longer in the real time class. Meetings were also used to look ahead at the next week. In addition, we might include any of those spontaneous things that may have happened during the live class, such as an interesting daily warmup or an announcement about one of our all-school Twitter chats (that's another blogpost!)

Weekly Meetings with Project Team:

Every week, we had a meeting involving the whole project team. These meetings were to our mental health what water is to a plant. We were extremely fortunate to have at the helm of these meetings a leader whose enthusiasm and insightful feedback kept us all moving ahead with our eyes on the prize. As a team, we evaluated our progress, compared notes, shared tips, reflected and generally forged our year-long path together.

This post describes the common experience from the teachers' point of view. Of course, there was some variation in the tools we each used, but the main components of the course structure, design, development and delivery...were the same. My next post will be our reflections about the actual boots-on-the-ground experience. Stay tuned!

Friday, March 23, 2018

Marrying Student-Created GeoGebras with the GeoGebra Group Environment

I've had my students create function summaries using geogebra before, and I've had them doing activities in our class's GeoGebra Group before, but this week is the first time I've done both at the same time. I'd been hesitant to marry these two things, even though I love them both, because I was unclear on when and how often a student can edit their own ggb when it lives online in a group. Well hello, the answer is whenever and as many times as they want. It doesn't matter if they turn it in or not, it doesn't matter if I tag it complete or not, none of that matters. Their own individual work is always open to them and anything they do is automatically saved, no matter when they do it. Just like the offline version, except WAY easier and cooler.

Why is it easier and cooler in the group environment? Usually, these summaries involve students using the offline GeoGebra, saving and numbering successive versions of their function summaries, sending each version to me, me downloading each version, me giving feedback on each version (using various tools completely separate from ggb, eg annotating a screen capture, or Camtasia video, or Smart Notebook etc) etc. But when it's all done in the group space there's no need for any of that - no saving, no numbering, no sending. And my feedback happens right there, in the same space as their work - right underneath it in fact, in a chat box, to which they can reply, also in the same space.

Here's what I did:

The Rollout:

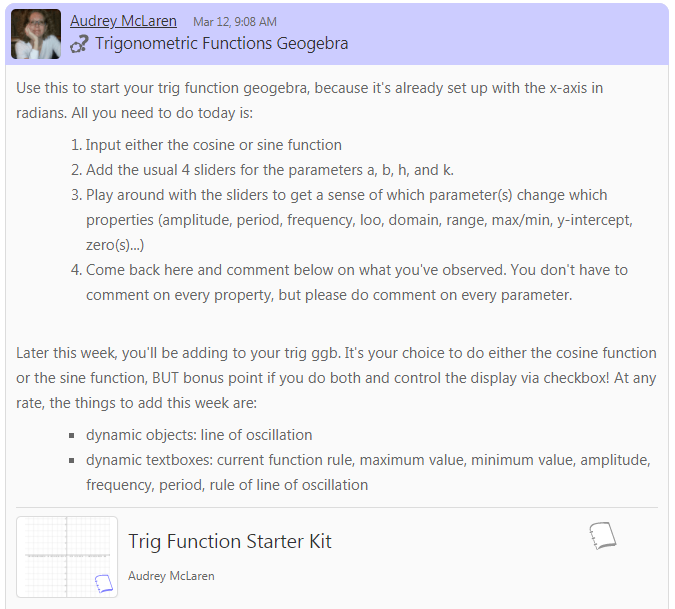
The students login to our group at www.geogebra.org,  where they see this post:

...in which they find out they'll be doing a GeoGebra task, then coming back to this post to make a comment right underneath it, in the public comment space.

To get to the task, they just click on the "Trig Function Starter Kit" and see this:

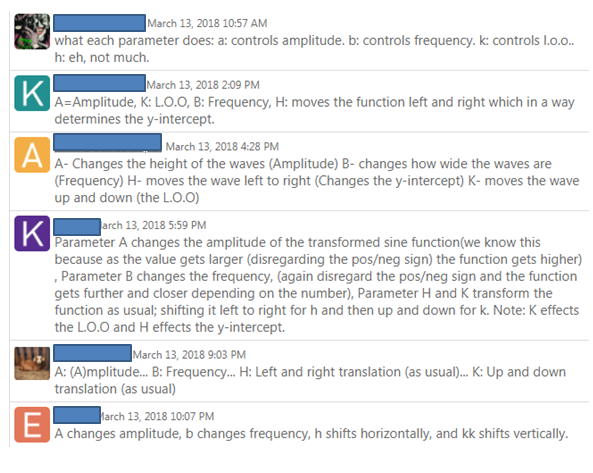
The task on the first day: Input one of the two wave functions, with all 4 parameters, and add the a, b, h, and k sliders to the worksheet, so they can start experimenting. They played around with the sliders until they were ready to post a comment in the public comments section about which property(s) is(are) affected by which parameter. I wanted the discussion to be public so that they feel part of a community of learners, and they can learn socially. Here is a screen capture of some of the comments as they appeared in the public space:


The Gathering:

They of course can all see everyone else's comments, but I wanted to rearrange them to give a different perspective. By the next day, I had sorted all their comments by function, student, and parameter, as you see below. This way they could see who went with which function, and who had already decided to go for the bonus point ("K" at the bottom - I suspect that seeing this caused many to do the same the next day!). They could also see, in one slide, that everyone agreed that parameter a changed the amplitude:
Parameter a

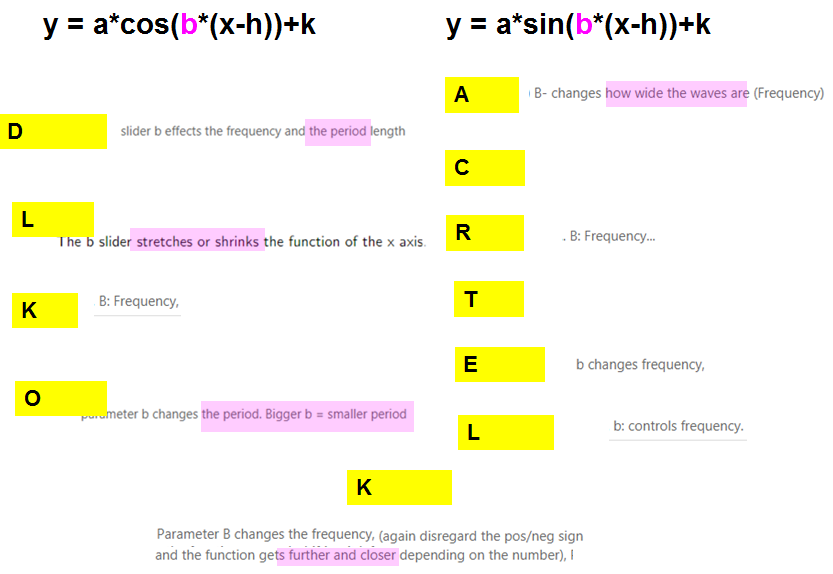
This sorting also revealed that everyone agreed on b affecting the frequency....
Parameter b

....but the one below showed that not everyone noticed that b also affects the period. I love how some students extended their comment to explain why: "...how wide the waves are", "...bigger b = smaller period" This is another reason I like the discussion to be public - so that everyone gets their brain stretched.


Parameter b


The Dynamic Phase:

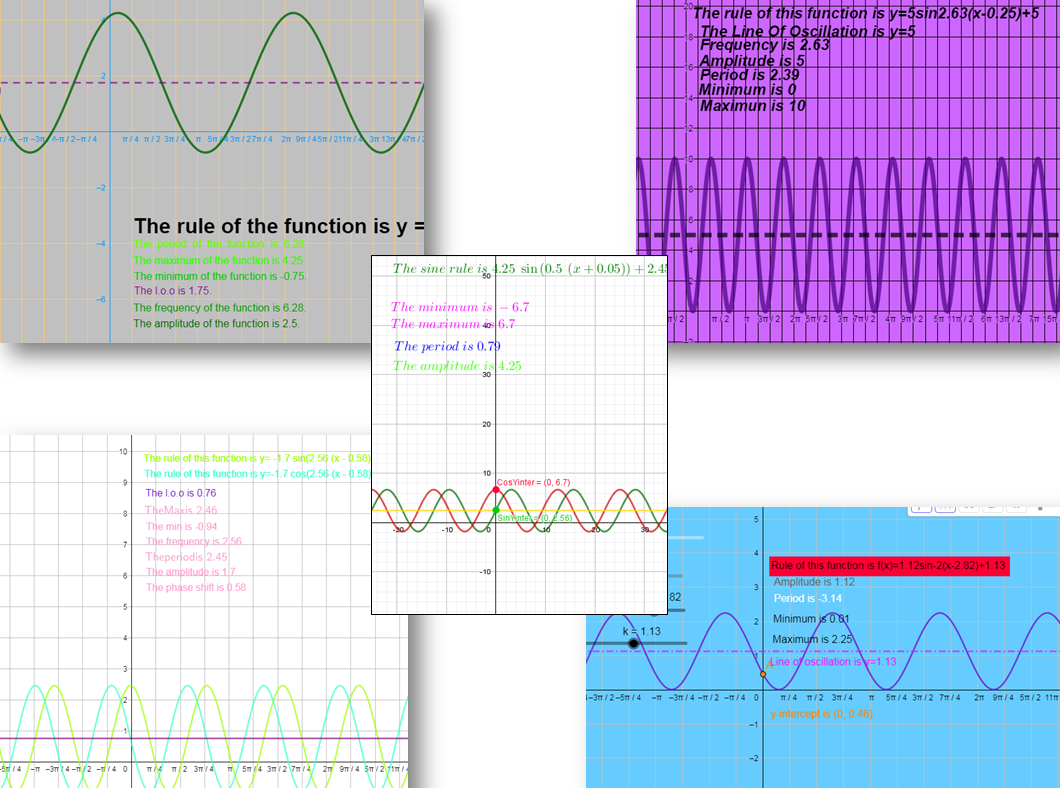
Next it was time for them to add dynamic info to their ggb: the line of oscillation, textboxes showing the max and min, amplitude, frequency, and period. I emphasized that since we'd already decided that, for example, b affected the period, then the textbox about the period should include some kind of formula involving b...and amplitude should involve a etc, and in fact, they'd already seen those formulas in a voicethread. So off they went to add to their ggbs. and I gave feedback in the private space. Lo and behold, there were mistakes aplenty, some of which I hinted at in my feedback. But I wanted them to be able to do their own detecting, to check their own formulas. So my next phase was...

Check Your Own Formulas Geez!

Next day in class, we spent a few minutes filling in this table from the text:


using what we already knew about how to find amplitude, period, maximum, and minimum. At this point they already, theoretically anyway, "knew" that amplitude = |a|, frequency = |b|, Max = k + |a|, etc. So this table was filled without geogebra, only math knowledge. Once we'd all agreed on the correct answers, and I'd done all the necessary intervention to make sure they were correct, I said ok - go to your geogebra and see if IT'S getting the right answers.....aaannnd....delightful flashlights ensued!
"oh no mine's giving -3 as the amplitude"

"mine says period is 2pi/3.5 how do I get it to actually calculate the period?"

"how do we set the b slider to pi/5?!"

Talk about differentiation, and just-in-time learning.

A Turning Point

This step was really important, and it's one that I've been aware I needed to improve on - to start with the math. Instead of students relying on the tech, I want the tech to rely on them. It's one thing to get an answer right, it's another thing entirely to cause someone else - or in this case something else - to get it right. This step also addresses my fear of digital dust - that once these beautiful works of geogebra art are handed in, they are never looked at again. Starting this class with this table exercise went some way to motivating them to use their own work, but first they have to OWN their own work, to TRUST it. And in the process learn how to empower and trust themselves.

This time my feedback took even less time. A lot of things had already been fixed. But I did notice that things were getting verrrrrrrrry colourful!


Building on solid ground

The next task, version 2, involved adding features that depended on all the formulas already established and working properly in the first version. For example, I wanted them to add a dynamic textbox about the domain and range. Range, of course, depends on the max and min values, for which they've already written and verified their formulas: max = k + |a| and min = k - |a|. They could therefore just say "range = [k-|a|, k+|a|], and let geogebra do the calculations.

Cool, but the absolute best part...

This came about because my students instinctively did something in a way that I totally did NOT anticipate, and it actually made a lot more sense from a pedagogical point of view. So they kind of taught me how to teach them.

I had also asked for a few "sticky points", including what I call the boc (beginning of cycle) and eoc (end of cycle). (Sticky points btw are what I call points that always stay in the right location on the graph eg a y-intercept that is always on the y-axis no matter how the parameters are changed. More on this here.)  The boc would therefore stick to wherever a basic cycle began, and the formulas I had in mind were boc = (h, f(h)), and eoc = (h + period, f(h + period)), but one student, who had elected to do the sine function, said to me, Mrs, isn't the boc just (h, k)?

And I replied "no, but you're close", thinking that she was confusing vertex with boc.

And then one by one, my students, at least those who had also elected to do the sin function, thought about it, and said Mrs she's right. The sine function starts on the loo (note - that's what we call the line of oscillation), which is k. Then the cosine people started to ask well that's fine for you guys but what about the cos where does it start oh wait it starts at...the max oh ok. And one asked me privately "isn't that only if a is positive? If a is negative doesn't it start at its min? how do we do that in ggb?" And I, the teacher, who is supposed to know everything, didn't have an answer for her. Yet. It was awesome.

AND EVERYBODY LEARNED SOMETHING.

I had NOT anticipated anyone doing it this way - by using the key points (max, min, loo) that apply to the actual function they've chosen, and now I realize the HUGE benefit of doing it this way. It forces everyone to really look at the structure of the wave, that sin with a>0 is loo-max-loo-min-loo, cos with a>0 is max-loo-min-loo-max. And it's different when a<0. Next year....this will be in my improved game plan.

It's funny, I had originally let them do only one function, sine OR cos, because I didn't want to overload them, but it turned out to be a starting point for a deep discussion between two camps - the sine people and the cosine people. Once everyone's version 2's are all corrected and verified, I'll get to ask "Can anyone think of a formula for boc that would work for BOTH functions?" That'll be when boc = (h, f(h)) & eoc = (h+p, f(h+p) would have a bigger impact anyway. I'll also have them discuss which formulas are the same in both camps, and which are different. EEEEEEE I'm SO looking forward to that.

The advantage of the function summary in GeoGebra:

I maintain that getting them to do this task, to make something else work properly by using their math knowledge, is the closest I can get my students to becoming teachers, which, it is generally agreed, is the best way to learn something - by teaching it. They're kind of teaching geogebra what to say, what to look like, and where to put the points so they stick. And it's lovely. Each discussion that springs out of these tasks is richer and more meaningful because of the ownership, or maybe it's called agency now, of the work. And each discussion leads to other even richer ones, for example after the boc one, we moved on to the eoc, which of course will have an x coordinate that is one period further afield than the boc. But the path to a student realizing that is fascinating to watch, and talk about an aha moment. And who already has a verified formula for the period? My kids do.

The advantage of the marriage:

As I mentioned before, the flow is hugely improved. It's so many fewer steps, for all of us, to get the back-and-forth that's so valuable. I've always tried to set things up so that my students feel like I'm running the marathon alongside them, rather than just standing at the finish line with a red marker pen, but the way groups are set up, it's so much easier. This private convo:

...which happened in the group space would otherwise have taken at least 3 save/upload/download/give feedback/upload/download cycles and it wouldn't all have been in one place. To say nothing of the impact of the public forum on that social aspect of learning. I feel I've only just seen the tip of that iceberg.

Wednesday, January 17, 2018

First attempt at stations in the live online class

I've been trying to find an alternative to the usual group work, and also, I've long been wanting to try out "stations" in my live, virtual classroom. The trick was how to simulate easy movement, make clear goals at each station so I don't get run ragged, keep things moving, and have time to process the math at the end. Today I finally did it.

In our environment, the closest thing to a station is what we call a breakout room, or bor for short. They are really just other websites, of course, that are somehow attached to the main classroom. Here is how they usually look from the dashboard:

Usually, I put students into whichever room I want by dragging and dropping their name into it, much like moving a file into a folder, and in fact it ends up looking that way too (pretend I'm a student):


But I can create as many bors as I want, and call them what I want, and make them any colour I want, so today, here is how my stations looked:


Why did I set them up this way? Because this was the activity:


The task was to shade equivalent boxes in matching colours, using the properties of exponents, and the exponential situations we've studied so far, including rational exponents, negative exponents, and the property (a^n)^m = a^(nm).

Here's how it went down, along with how it would look in a brick and mortar situation, in case it's hard to get your head around what the heck I'm talking about:

Step 1: Simulate easy movement: 

First I gave them all moderator status so THEY could move themselves into and out of any bor they wanted. This way they all get to go to each room at their own pace, plus I found it was a nice break from me picking who is going to work with whom.  Also it makes it feel more like they're moving around in a classroom station situation. We first practised that a bit, so they could get used to the controls.

Brick and mortar equivalence: Kids can usually move around in a classroom.

Step 2: Clear goals at stations

Upon entering a bor, they all saw the same slide, which was the one above. Then, if they were in the turquoise bor, they'd colour in (using the virtual highlighter pen) all the things equivalent to y = (1/2)^x, if they were in the yellow bor, they'd colour all the things equivalent to y = 3^x, etc. Students can see what bor they're in, so again, it's all as obvious as if they were in a brick and mortar classroom.

Brick and Mortar equivalence to this: Having 4 big tables, each with a giant place-mat like the above, preferably with a covering that makes it easy to erase, with each table equipped with highlighter pens in only one of the four colours, so there's a bunch of turquoise pens at one table, and a bunch of pink pens at another etc. It's important that the highlighter pens be erasable though, and I don't know if such a thing exists. So also you'd need erasers.

Step 3: Keep things moving

After a few minutes, I said "Change rooms!" and watched their names jump around. I had already told them that if they agreed with the colouring that had already been done, leave it there, and see if there were any other things that should be coloured. If they disagreed with what was already coloured, they could change it. The idea was that this would filter out the easy egs from the harder ones, by a loosely formed consensus.

Brick and mortar equivalence: Saying change stations, whereupon students move to another table. They can change what's already coloured and add as needed. I'd probably have to make sure the right coloured pens would stay at the right table!

Step 4: Keep things moving and varied

Repeat step 3 twice, so that everyone has had a chance to go to each station.

Step 5: Process the math

I took snapshots of each of the final bor screens as everyone moved them selves back to the main classroom.

Brick and mortar:  Telling everyone to go back to wherever they usually sit while I gather the place mats.

Step 5: I displayed each snapshot, we discussed, I showed the answers, and we discussed some more. (Brick & Mortar I'd do the same.) Here are a few of the actual ones, compared to the answer slides:
The turquoise were all correctly coloured

The greens were mostly correct

Missing a few pinks and one incorrect
Add caption
And missing a few yellows


Here's where my evil plan started really playing out:

  • Each colour had some really obvious ones that were not in dispute, like 3^(-x) and (1/3)^x, so we didn't have to spend much time at all on those. 
  • Each colour also had some that weren't so obvious, like why is 27^(-x/3) the same as (1/3)^x? Also the one about why losing 2/3 gave a base of 1/3. This was a chance to add a layer to their understanding of exponential properties. I asked for volunteers to explain these.
  • Each colour had something that I anticipated no one would colour, and bingo, I was right! These examples involved e, and for most this was the first time they'd seen it. So this was a nice way to introduce it.
I usually try to think of what I'd do to improve, but all I can think of is additional examples to add. Since there was no dispute over the turquoise, that could use something in it to uncover a gap in understanding. Otherwise, this went well, and it didn't take a lot of set up, since there was only one slide for all the rooms. Also, I didn't have to chase after any actual pens!