Tuesday, November 24, 2015

Why I Desmosified One of My Favourite Geogebras

I'm a certified GeoGebraphile, and have been for years. All that time, I kept hearing about Desmos, and thinking - it's lovely but I can do so much more with GeoGebra. But now that Desmos has introduced its Activity Builder, I'm torn between two dynamic geometry thingies. Here's why:

Desmosify:

First of all, that means "to transform into a Desmos activity using the Desmos activity builder", or at least that's what it seems to mean to Dan Meyer, so it might as well go into the new dictionary.

Dan was talking about paper worksheets getting desmosified, but I did it to a GeoGebra of mine. I've used this GeoGebra now for a good 3-4 years, and it's always been one of my favourites, perhaps for sentimental reasons. It was one of the first ones I made that I felt had an actual impact on my students' understanding of a concept. Rather, it intervened to correct a common mistake that many of them made. Never mind what the mistake was, the point is, for me to do this to this particular GeoGebra was kind of a big deal.

What used to happen

Typically, my students would open the applet, which would look like this, to them AND to me:


And they'd work on it on their own, or if they were so inclined, with someone sitting near them. But I could never see what they were doing at my end (I teach long distance). And if someone was stuck they'd ask, of course, but then there'd be kids who wouldn't ask, for the usual variety of reasons - too shy, no idea what to even ask, or something else had their attention. Then those who were so inclined would put their answers in, save it on their hard drive, then upload it to me on our LMS. I'd open it up, and it would look like this, to them AND to me:
:

And I'd assign a mark, send it back, and go over it the next day, and I felt that they'd had a productive struggle that was well handled by the visual and interactive nature of the software.

What happens now

But this week, at the last minute, when I desmosified it, it became all that and something else. The activity had all of the goodness it always had, plus it came ALIVE.

How do I show you how it looks? Not easily, because how it looks changes all the time! It's a shared experience in real time, not to mention that it doesn't even look the same to me as it does to them.

What students see:

This is what my students see when they go to student.desmos.com and type in the class code I gave them:

Slide 1/3
(If you'd like to really see it through their eyes, go to student.desmos.com, and type in 9Y5F where it says class code.)

This first "slide" I made is very similar to the GeoGebra version.

What I see:

One big difference in the live version though, is I knew the moment each student logged into the activity from my teacher view:

(If you'd like to really see it through my eyes, here's the link.)

On the left, I see their names as they enter. Once everyone's in, and working on slide 1, I can click on the first rectangle that's titled "Radical rules", and see this:


I can see what each student is doing LIVE in that first slide of the activity. What you see in this image is of course static, and the end result, but during the activity I sat and watched their graphs appear, disappear, adjust etc. I can also zoom in on one kid and see what they problem might be. I could tell when someone needed help, and offer it. I couldn't do that in the moment in the GeoGebra version.

Another huge difference, as you can see, is that there are 3 slides. Once they're done slide 1, they go to slide 2 and see this:


The real gold to be mined:

And I see, again, LIVE, their typed answers appear like this:


I can set it so that they can see each others' replies, so naturally I'd ask higher-order questions in that case. Or get them to.

So this isn't just a math activity to get the right answer, it's now a starting point for a discussion.

Or it's a place for them to reflect, focus, notice, wonder - to step back for a moment before moving on - together! Before we all move on for that matter! I need to know if they got the point too!

It's also a way to do on-the-spot formative assessment, because I can set it so that they can't see each others' answers.

And as the amazing people at Desmos keep working with the equally amazing #mtbos (and really there is no distinction between those entities) it will be more and more customizable, so it can become whatever you want it to be - but the LIVE part is the gold for me. I want classes in which I am surprised too!

So who do I love?

Does this mean it's over for me and GeoGebra? HELL NO! I'm still a geogebra-holic, but I'm finding that I'm using it differently now. It has features that aren't available (yet) in Desmos, or that would only be doable with an onerous cognitive load for students to handle AND learn math at the same time. Longer-term, more complex, and individual assignments like this.

In fact, I've also used Desmos activities sometimes to lead up to the major geogebras, as I wrote about here. I think the interface for desmos is less intimidating for most students. Its immediate response, the fact that there's no need to even hit enter, makes it friendlier for them.

So in summary, Desmos, and GeoGebra, I love you both. 

Monday, November 9, 2015

Reflections on Desmos Activity - Piecewise Functions

I'm finding that just about every activity I've ever done over the years is adaptable to and even improved by the Desmos Activity Builder. It's getting to the point where I'm making those instead of doing other things that are part of my actual job, like correcting, planning.....it's become a sort of guilty pleasure.

Here's the link to my latest activity:


A few reflections, some of which are based on those I've read in these posts from others.

Practical stuff:

1.Since you can't hide the equations from the students, and since those equations would be the answers I wanted them to find, I put the folder containing those waaaayyyyy down so that it would be unlikely anyone would find it. In case anyone did scroll down to line 34 for no reason other than to waste time, I rewarded them with Dan Meyer's "Nothing to see here" as a title for it. Which one kid did, and he now thinks I'm hilarious.

"That's cute Miss."
2. Echoing what Bob Lochel said here, keep the questions efficient. I put too many questions all in the same question slide. I need to exert some self-control there.

Pacing:

I took heed of Shelley Carranza's great post, specifically the part about pacing - letting students have time to explore, but then bringing them together for some explicit instruction before they continue. Once I saw that everyone was at slide 3 (because that's one of the things you CAN see with this tool!), I brought everyone back to slide 2 to read everyone else's answers/comments. I didn't spend a lot of time, just enough to use the "without lifting your pencil" idea to introduce the word "continuous" at this point, and to point out that something can be discontinuous but still a function. There were some other things that their comments made me want to discuss, but I knew I was going to followup next day, so I left them for next day.

Followup:

I'd love to read more from others about this. Maybe if the activity is designed well enough, followup isn't an issue. Maybe my activities are too long? At any rate, the things I was concerned about were:
1. mining their comments
2. giving the answers 
3. showcasing their work.
To do this, I took screenshots of all the slides, annotated them, and made a powerpoint with those for next day.

1. Mining their comments: For the comments I saw during the activity that I really wanted to address but decided to leave until next day, here's what one of those slides looked like:

I tweaked Fawn Nguyen's use of colour-coding highlighter pens - instead of using it for assessment of student work, I used it to group their comments. I used the orange to reinforce the meaning of "continuous", the blue and green ones to discuss their "I wonder"s and my "hmmmm"s (things I wanted to address/clarify/straighten out), and I got them to answer some of the questions that had been raised. I know this has a lot of potential, but I felt like I was doing way too much talking while going through these slides.

2. Some slides had definite right answers I wanted everyone to know, so here's what that looked like:
It was also an opportunity to repeat how to specify the domain using Desmos.


3. Next slides showed everyone's custom-designed piecewise functions. Many had already tweeted theirs out, but I wanted to make sure everyone saw everyone's, and to get reactions in real time. 

You can see more of them on Twitter using the #piecewisefn hastag. Enjoy!

Thursday, October 22, 2015

Sticky Points

A sticky point is a dot that stays in the right location on a Desmos (or GeoGebra) graph no matter how the sliders are moved. Why don't I just show you?

It came out of my new and improved way of introducing my students to making their own Desmos/GeoGebras to study functions. I decided to frustrate the heck out of them so that they would beg me to show them how to do the thing I wanted them to learn in the first place. Inspired by Dan Meyer's headache-for-which-math-is-the-aspirin idea. Getting a point to stick shall be their aspirin.

The Activity:
First, as part of this desmos activity, (which I made using the amazing Desmos Activity Builder - DAB to me) they had to move the sliders for this linear function:

...then type in the coordinates of the function's y-intercept in order to get an orange dot to show up on the graph like so:

...then move the sliders around again, and repeat:

and repeat, and repeat....and of course, most of the time, the y-intercept changes, so they had to keep re-typing the orange dot's coordinates so that it was where the new y-intercept was. Frustration! Eventually (read - as soon as someone started whining) I said 

"Wouldn't it be nice if that orange dot automatically moved to the location of the y-intercept as soon as you moved the sliders?" So the next activity slide was all about what ordered pair can we type into Desmos so that that happens:

Well, because of the way the DAB is made, they could easily share their ideas with me, and each other, about how to do that:

And voila, if the orange dot moves around and is always at the y-intercept right along with the sliders, that point is sticking. It's a sticky point.

The next slide asked that they do the same thing for the x-intercept - to type in an ordered pair that will stick to the x-intercept, no matter how we move the sliders. This took more time, of course, which on one level is amazing to me because they spent an entire year already on the linear function - how can they not be experts at finding its zero?

BUT, on the other hand, solving 4x - 2 = 0 is very different from solving ax + k = 0. The second one requires that they see the a and the k as numbers, even though they're letters, and seeing the x as a variable, even though it, too, is a letter. I'm sure the sliders sitting right there in front of them, with numerical values showing, helps with this idea. Interestingly, one student, who happens to do a lot of coding, got it immediately.


Next day followup & new activity:
The next day, I shared the graphs of those students who had everything sticking, so that everyone could have the experience of typing in the formulas and seeing that the points stick.

On to quadratics then. I summoned the DAB and made this activity:

Which was the same idea, getting points to stick, but this time, the vertex, the y-intercept, and the zeros. The vertex was super easy and most got it right away, so now I wanted to bring up how to use the sliders to check if your point is sticking. Here were their responses to that:


After all, I want them to not only get their formulas right, I want them to be able to decide, and be their own teacher, about when they're right AND, more importantly, know when they're not.

When things got really interesting, for me anyway!
Once the vertex was sticking, it was on to the y-intercept. Here's where things got really interesting. Again, it was no problem for anyone to calculate the y-int when a, h, and k were numbers, but slow going when they were just a, h, and k. Eventually, here were their responses on the slide that prompted them to share:


They were checking with the sliders! And a few unexpected things popped up - one student mentioned the y-intercept for the general form of the quadratic, and one simplified the expression a(0-h)² + k to ah² + k. I had the opportunity to talk to those students about their particular work - the one who was thinking about the general form eventually made a whole desmos just about that, and got those same points to stick!

Which brings me to what I really love about the Desmos Activity Builder:
With a tool like this, anything is possible. It puts control, if that's the right word, in everyone's hands. 

And here's the thing - You don't get a tool like the DAB, where who learns what is all up for grabs, and use it to make something with the same single outcome for every student. It's just not possible! 

My ultimate goal....student-created GeoGebra's!

All of this was ultimately leading up to their first GeoGebras about the Absolute value function, which is their first new function for this year. They just started them yesterday, and there's plenty to add, but I already find it's going MUCH better than in previous years. They are already familiar with the sliders, AND with the idea of formulas for important points. I'll share those here soon, but in the meantime, some kids are already sharing them via the #ggbchat hashtag:


Happy DABing!


Friday, October 2, 2015

If Only I'd Used a Hinge Question 3 Weeks Ago

After correcting this week's assignments, I discovered many students are still not able to find a vector's direction, given its components. This is something that I supposedly taught 3 weeks ago, and thought I'd checked for understanding, but....oh well. A hinge question 3 weeks ago would have been awesome. I would have known who, what, why, and how bad things were, and come up with a way to straighten out their vector issues.

Haha! Get it? Straighten out the vectors? It's been a long week.

As usual, it's only when it's too late for this year's students that I have clarity on what to do, but in my defense, seeing so many possible wrong ways to do it today was what guided me to writing this hinge question.

To generate the wrong answers, I used today's mistakes. The 3 big ones I saw today: not taking absolute value of components, wrong order of ratio, wrong quadrant formula. I saw one person using the y-axis as a reference instead of the x-axis, so I'll put that in just a few answers.

Find the direction of the vector <9, -20>.

If they get 294 degrees, they're right.
If they get 426 degrees, they did 360 - arctan (-20/9), ie didn't take abs value of 9
If they get 335 degrees, they did 360 - arctan (9/20), ie wrong order of ratio, OR they did 270 + arctan (20/9)
If they get 66 degrees, they did arctan (20/9), ie wrong quadrant
If they get 384 degrees, they did 360 - arctan (9/(-20)), ie didn't take abs value of 9 AND wrong order
If they get -65 degrees, they did arctan (-20/9), ie didn't take abs value of 9 AND wrong quadrant
If they get 24 degrees they did arctan (9/20) wrong order and wrong quadrant
If they get -24 degrees, they did arctan (9/(-20)), ie wrong ord, wrong quad, no abs val
If they get 204 degrees, they did 270 + arctan(-20/9) ie used y-axis as reference AND no abs val.

Thursday, September 17, 2015

Vector Addition Goodness - and Quirkiness

This went well.

It turned out to be a quick way to generate lots of examples - simple ones and quirky ones, and to target specific examples so that we could look back and look ahead in the vector unit.

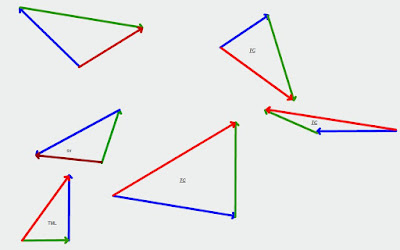
We've just started vector addition. Here's the activity I put together for my online class today:


We're all online, so anyone can easily move these arrows around by clicking and dragging them.

I split the kids into groups of 2-3, and told them to each pick one blue and one green vector, add them, then draw the resultant in red (these colours matched the ones from the previous evening's voicethread.). Since there are 6 blue and 6 green, there are many possible combinations of vectors - 36 in fact (an opportunity to talk about math that's not usually part of the vectors unit!). They didn't have to do them all, of course, just do 3 pairs, or enough to use up all the vectors.

Because they were dragging instead of drawing, it only took about 5 mins for them all to finish. I took snapshots of each group's work, then we reconvened in the main classroom space. Here were some of the results
Group 1:
First we together looked at all the examples group 1 made and decided if there were any mistakes - which happily, there weren't. Then I saw the first part of my evil plan unfold. (I had only a 1/36 chance of that combo happening, yet it happened!) The combo at the very lower left was two horizontal vectors of opposite directions being added. A quirky one that I wanted everyone to see, and since only one group did that combo, it kind of was an example that had a personality to it - it belonged to a person!

Group 2:
We repeated for group 2 - checked the answers first, then more evil plans unfolded. (Another long shot happened, geez I should buy a lottery ticket today.) In the lower left corner, someone had added a green and blue that were perpendicular to each other. I asked them to think about where they'd seen something like that before - and after a few seconds I heard - the blue and green are almost like the components of the red. Almost? OR EXACTLY?!? We talked about how all along, the components of a vector (with which they're already familiar) actually add up to that vector. When they'd been drawing a vector's components all last week, it was kind of like they started with the answer, and drew a question to go with it.

Group 3:
Weird how all my evil combos ended up in the lower left corner...anyway here we saw the same component-style example except that they're added in a different order, but still giving the same resultant.

I then showed them a combo that no one had picked, but that I wanted to address:
I had, of course, deliberately put in a blue and green that were identical to each other. We talked about what the resultant for this would look like, and it was a nice intro to something we haven't done yet - multiplication of a scalar and a vector.

What I liked about this activity:
  • the possibility of everyone seeing so many examples in a relatively short time (this all took a total of 20 minutes)
  • the possibility of interesting and unusual examples for discussion
  • the personalization of the examples - I didn't make them up, not really anyway, so that I could refer to "Susie's example", instead of a cold "number 3"
  • It gave kids who think outside of the box a chance to try something outside of the box, and feel like it's ok to do that. In fact, it was fantastic to do that!
  • It was a great intro to the geogebra that I then had them do individually, in which they were pretty much doing the same thing, manipulating vectors to add them, with a few twists, like find what vector I have to add to this one to get that one (intro to subtraction)
Next time:
  • I'll make sure to keep WAY more copies of the original arrows - easier to show combos that no one did that way
  • Find cases where two people added the exact same vectors and got the exact same resultant
  • I'll include the potential for more quirkiness, like opposite vectors adding to zero. You can never have too much quirkiness.

Thursday, April 16, 2015

Always-Sometimes-Never Intro to Identities

Today, I tricked my students into writing identities, without saying the word identity even once. And I think I got them to appreciate how awesome truth is.

The progression during this class was that my students:

1. classified statements as Always true, Sometimes true, or Never true

2. filled in the blanks in a statement so that it was Always true

3. wrote their own statements that are Always true

Part 1: Classifying:
Here are the statements I wrote on the eboard, each of which they then labeled with A, S, or N, and after each of which we discussed why (that's the italics):

Θ = Θ + 2Ï€     
NThe notion that = means "is the exact same number as".  Coterminal is another thing entirely.

sinΘ = sin(Θ + 2Ï€) 
AA lot of confidence about this being an A, due to the previous discussion. The seed was planted that finding an A is kind of a big deal.

cos Θ = 1
S - I insisted on hearing some Θ's for which it was true.

cos Θ = sin Θ
S - Same as before, except this time, tell me all of the Θ's for which this is true

Here I had to pause and get them comfortable with locating angles like Θ + Ï€, Ï€ - Θ, etc on the Unit Circle, so that they could visualize the next statements. I had them drawing random angles for Θ, then the corresponding Θ + Ï€ etc.  Once they were ready, I asked them to classify this one:

cos (Θ) = cos (π - Θ)
N - Lots of lovely arguing, many said well they're equal but opposite. How to say that algebraically ..... and let's convince ourselves with a few angles on the calculator (in degrees though!) ...now it was time to segue to part 2.

Part 2: filling in blanks to make an A:

sin Θ ______ sin (π - Θ)
cos Θ _______ cos (Ï€ + Î˜)
sin Θ _______ sin (Ï€ + Î˜)

This part was done in groups. I witnessed some fantastic discussion - which I was unable to copy and paste due to a tech glitchy thing, but there were drawings being done, there were angles being tested on the calculators, there was correct vocabulary being used....it was truly exciting to see the strategies they were using to decide and then convince. I didn't have to say much. I shut up really well.

Part 3: writing A statements from scratch:

This time all I said was "Tell me about the relationship between cos Θ and cos (-Θ)."

Back into their groups they went. (There was no need to say, oh by the way, I want the truth.) They figured out where -Θ was in relation to Θ, they looked at their x-coordinates, they wrote a statement, they tested it out on random angles, and then ALL groups proclaimed:

cos Θ = cos (-Θ).

We repeated this to get (in a lot less time btw):
sin Θ = -sin (-Θ)

and talked about whether or not we could also say that
-sin Θ = sin (-Θ)


Tonight's assignment:

Tell me about cos Θ and cos (Θ + Ï€/2). And I want the truth. I can handle it.

Monday, March 2, 2015

Off the Wall Flashblog post

What an awesome idea, the flashblog post. Topic- what is the most off-the-wall lesson you've ever done?

The only thing I can think of is the voicethread I did last year called "What Would the Teacher Say?" in which I showed a step-by-step procedure (mathematical of course) and I asked them to supply the explanatory comments for each step as if they were the teacher. It was a procedure made up of things they already knew about, but applied to a new function. I think I tried to start a new hashtag #wwtts but it didn't take off.

The idea came to me in a flash, I can't even tell you from where. But some kids took me at my word and tried to mimic me, while others went too far into the back ground knowledge and over-explained things. But I'm going to try it again!

Friday, January 30, 2015

Teaching Logarithms Using Suspense (okay and GeoGebra)

Every year, when I start the logarithms unit, I brace myself. I know I'm going to lose a lot of kids. I've tried all kinds of ways to make logs clear. I've written about it here, in fact, and each time I think "This is gonna be great!" but then it's not. But this year, I think I hit on something. I really mean it this time. No really!

And guess why!?!? It's because of the geogebras I've been getting them to create. (If you have no idea what I mean by that, this will give you some idea.) Another unexpected benefit that just kind of fell into my lap. I'm using their exponential geogebras to create suspense about logarithms!

Where we are now

We're currently studying the exponential function, and this time I had them start creating their geogebra explorers very early in the unit, so that they could use them in parallel to the lessons, for pinning things down, validation, exploring, whatever. (Note to self: Do that next year for every function. It's too overwhelming for them to do it all at the end of the unit.)

Anyway, I knew that they'd be able to get their sliders, asymptote, domain etc etc all done, but that when they'd get to the zero, specifically figuring out a formula for it, they'd be at a loss. When I first realized this, I thought, ooh, that might be frustrating or confusing, but then I realized that it would be an opportunity to motivate the need for logs. Just the act of asking me "How do we solve for the x in this?", ie an equation like   indicates that they are aware that this is a thing. A new thing. Which let's face it, logs are.

The plot thickens

They haven't done logs, so this kind of makes it suspenseful for them! I'm hoping that in a week or so, when I reveal logs to them for the first time, instead of the usual confusion and horror and OMG THAT'S IT I'M GOING INTO ART, I'll get "Oh! So that's how you solve that equation!" or something like that.

To add to the suspense, I had them spend some time struggling with the question: What can I do to both sides of this equation: , that is the opposite? I wanted to use that kind of language because that's what they are used to - again to motivate that this calls for something totally different. Trying to find that opposite operation, and failing to do so (which they did spectacularly), points them away from that old familiar safe language, which is a good thing. Kids, you're so not in Kansas anymore.

Questionable pedagogy?

It's not completely true that they haven't seen logs, actually, because I have shown them that to solve , they can get the value of x by either trial and error, or by using the log button on their calculator and punching in:


But they have no idea why that works, or what the log button does yet. Normally I don't encourage my students to do something without understanding it, but logs are different. I find the word itself is intimidating and doesn't sound at all like what it is - an exponent. So I get them used to hearing it for a while before actually explaining it. I'm not sure about the pedagogical appropriateness of that....but emotionally I think it helps. And it also lets them know that logs have something to do with solving exponential equations.

My evil plan's results so far 
Dr. Eeeevillllll!!!


So far, it has all worked exactly according to plan, at least for a few students. Several students got everything done in their geogebra except for the zero, and asked me to help them figure out the formula for the zero. I of course refused. Nicely though!

Another asked "Are we allowed to use logs to do the zero in our geogebra?" I said sure, in fact, you'll have to, there's no other way!  Now I think I should have just batted my eyes, all innocently, and said, "Well, sure, if you think it'll help..."

So the suspense is building, for them and for me! If only one kid figures out how a formula for their zero, all by themselves, I will be thrilled. That'll be better than all preceding years.

In about a week, maybe two, I'll write an update. Watch this space!